14
Oct
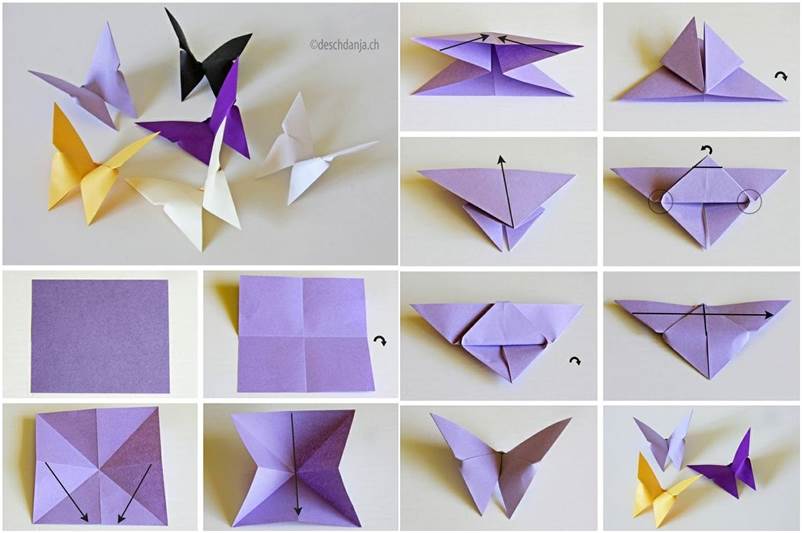
Crease with your fingers and then unfold. Turn the whole thing over, then fold the point upwards so that the tip peeks beyond the top by about 5mm (as shown).
How to make paper butterfly easy step by step. Get a template to create a simple butterfly. Now you need to concertina the paper. Flip the paper over and fold it up by another inch (2.54 centimeters).
Fold it diagonally and make a crease (1b and 1c). Method 2method 2 of 2:making a pleated paper butterfly. Fold the square piece of paper in half, creasing it.
Fold the right side into the center. Fold the bottom edge up by 1 inch (2.54 centimeters). Fold the tip back over the.
We are adding the butterfly’s hull and body. Get ready to make flaps. Now this part is a bit tricky.
Repeat step 1 for the other upper wing. Turn the whole thing over, then fold the point upwards so that the tip peeks beyond the top by about 5mm (as shown). Spread the two legs out for the top wings.
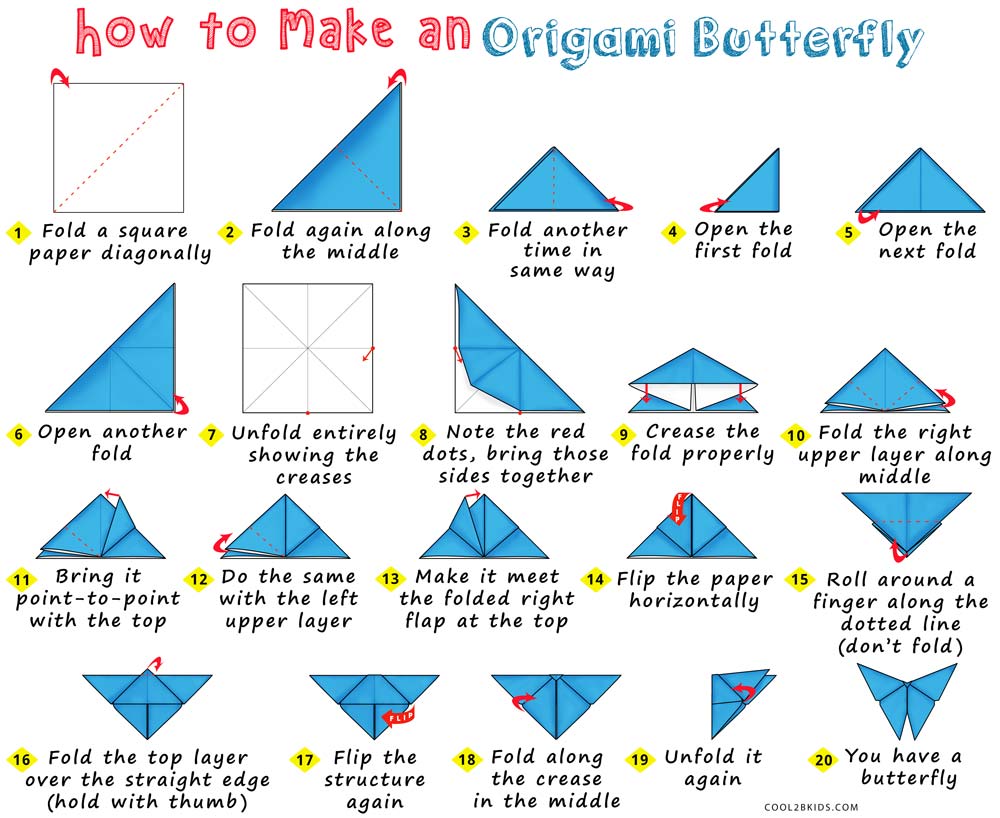
Fold it once into a triangle, unfold it, and fold it into a triangle on the other side. And fold diagonally in the opposite direction (1e) and make a crease. Try to make them small and even thr.
Make paper butterfly very easily. The spruce / chrissy pk. Cut a square paper of size 15cm (1a).
Bend square paper as follow. Keep flipping and folding in this manner, until you get a fan or accordion. Add tip ask question comment download.
Now, fold horizontally so that bottom two ends meet the top two. How to make paper butterfly step by step. Central fold, so you have a rectangle with pointy ends.
Glue them on the backside keeping the hearts facing up. Fold the left side to the center, too. Crease with your fingers and then unfold.
About press copyright contact us creators advertise developers terms privacy policy & safety how youtube works test new features press copyright contact us creators. Line up the edges of the paper when you fold it to make sure you’re. This will help complete the butterfly look.
Then, just follow the simple instructions in the video tutorial to finish your butterfly. Take the shorter one and again bend the very center of the wire into the circle, but don’t make it a closed circle. Using the glue, stick the heart antennas on the top side of the body base (oval shaped paper).
This paper butterfly is made from two parts. Now take the second strip of your origami paper and. As you can see, this paper butterfly craft is easy to make and kids will have so much fun making it.
Leave a tiny opening at the place where the wire meets itself. Apply glue on the edges of the paper strips and stick them on the cardtstock one by one as shown below. Next fold the paper in half, unfold it, and fold it in half the other way.
Take the other folded shape and press it on top of the first one, pinch them together in the middle for the glue to set. Create a fold that starts 1/2 inch (1 cm) from the right corner of the upper edge and extends down and right to the lower right corner of the upper flap. Cut out the pieces of paper needed to create the butterfly.
There should now be a x shaped crease going through your paper. In this paper butterfly video tutorial by pq crafts on youtube, you will learn how to make decorative paper butterflies in a few easy steps. We used a paintbrush to apply the glue which made it easier.
We are adjust what is needed to make the butterfly’s wings. Take one folded shape and apply a small amount of glue on the top middle part. Watch the video for more details.
Time to decorate the wings. Stick the small paper rolls inside the wings. Spread glue to the back of the googly eyes on the oval shaped part and use a sharpie to draw the other details of the butterfly paper.
Add tip ask question comment download. 4”x4” is a good size for a small butterfly, 6”x6” for a medium butterfly and 10”x10” for a large butterfly. Pull the left flap out in the same way, and flatten the top section.
Don’t forget that the butterfly also has antennae! You start by drawing and cutting your butterfly pattern. Take one piece and fold it in half length ways.
Glue the heart wing patterns on both sides of the body base. Holding the paper in the center, pull the right flap out to the right. Bend square papers as follow to get cross lines.
Cut out a square from a piece of colored card or paper. Decorate your wall and room with very easy paper butterfly. You're going to start off with a square piece of paper.
Start with the bigger paper strips to make the butterfly’s wings. This time, bring it up and back towards the right. Become an easy peasy and fun membership and access our.
Keep the papers together while you are folding them. Cut the square paper in half. Unfold and you can see two diagonal creases (1f).
We are making the butterfly’s next part. Open it up and fold in the 4 corners to meet the.
Previous post
How to make paper guns easy step by stepNext post
How to make paper boat easy step by step